How good is your computer filing system? Can you find what you need quickly? Does it help you feel productive and motivated?
I’ve now completed my computer-organizing project.
What a challenging, but ultimately rewarding, project it has turned out to be! More about that in a later post.
For now, let’s look at files and folders – those documents, pictures, videos, and other stuff we save.
How I Organized My Computer Folders and Files – With Organizing Tips For You
1. I Deleted Files I No Longer Needed
My first step in any kind of organizing project is always to get rid of clutter – where clutter means anything I don’t want or need. This makes all further decisions much easier, and life in general far simpler.
So the first thing I did was to scan my files for ancient or abandoned projects.
And I mean scan – in the interests of efficiency I just looked at file names and only occasionally opened a file to see what was in there.
Anything I didn’t want, I deleted.
Love that satisfying Trash sound!
Organizing Tips:
- How happy you are to delete things is a personal decision. I err on the side of deleting more, because I’m happy to start again if needed, and I enjoy having as little as I need of everything.
- Depending on your job and comfort level, you may choose to delete little or lots.
- Obviously, keep files needed for legal, tax, or business reasons.
- If in doubt about what to delete, see Step 2 below.
2. I Created Junk and Archive Folders
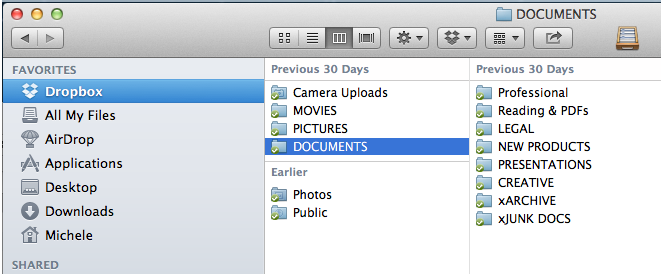
For files I felt uncertain about deleting I created a Junk folder.
I’ll probably never need to go in there, but I’ve saved myself the time it would take to investigate numerous might-need-one-day files.
For files I felt I’d not need to access, but wanted to retain as reference, I created an Archive folder.
I moved all my completed projects in there so they don’t slow me down when filing and retrieving the regular files I do use. They’re now located visually ‘offsite’ and out of my way.
I put an ‘x’ prefix on both of these folders so they’d appear at the bottom of my folders list when viewed alphabetically.
Organizing Tips:
- If you have files you don’t think you’ll want, but feel nervous about deleting, create a Junk folder and move your files there. You can always delete the whole folder later if you want to.
- If you have completed project files you don’t need to access regularly, but need to keep for reference, create an Archive folder and move your files there. This will make accessing your main files faster and less distracting.
- Put an ‘x’ prefix on any folder that you want to see at the bottom of your folders list when viewed alphabetically.
3. I Created Documents and Pictures Directories in Dropbox
I have an iMac (Silas) in my office and an Air (Tyrion) for working in cafes and other fun, non-office locations. I also like to be able to access all my files from my iPhone (Laurelai), as I often have FABULOUS ideas when out socially or at the gym.
So now I use Dropbox for all my files.
To keep everything simple and easy to find, I created folders in Dropbox for Documents, Pictures, etc, and removed these default folders from my Favorites.
Then I simply moved my files from their old locations to their new ones in Dropbox.
In other words, so that I naturally save and search for everything in the right place, I’ve made Dropbox the top-level directory for all my files.

Organizing Tips:
- If you like to access your files from multiple devices, consider getting a Dropbox or other cloud-based storage account.
- Recreate your folder directory under Dropbox – eg create folders for Documents, Pictures, etc.
- Move your files to their new locations. If you have a lot of images and video, you might like to start this process when you go to bed so it can transfer overnight.
- To simplify your filing and help you naturally save and search in Dropbox, remove the default folders for Documents, Pictures, etc, from your Favorites.
4. I Created Meaningful Sub-Folders And Gave Them Descriptive Names
With my main directories created, I next created sub-folders based on the way I think about my projects at the moment. This will make it easier for me to file and find individual files.
Then I moved the files to the right places.
Importantly, I named the folders so they quickly suggested the contents to me.
Organizing Tips:
- Under Pictures, Documents, and any other directories you have, create sub-folders that match the way you think about your projects. This could be by department, client, project, etc.
- Move your individual files to these sub-folders.
- Be sure to give your files and folders names that quickly suggest the contents. This will make it easier for you to save and find your files.
5. I Filed The Stuff From My Desktop
Last week I decluttered my desktop and put all the files I’d been storing there into a ‘Desktop’ folder.
So in this step I went back to that folder and filed everything in my new computer filing system. Then I deleted the Desktop folder.
Some of the files needed action – which is why they’d been lurking on my desktop. For these I created to-do tasks in Reminders, part of my newly created productivity system.
Organizing Tips:
- Move files from your desktop, or ‘Desktop’ folder, into the appropriate folders.
- If you need to take action on any of these files, be sure to create a reminder or to-do item for yourself.
Your Turn!
What do you need to do to create an effective, easy-to-use, productivity-inspiring system for your computer files?
Do you need to implement any of the 5 steps above? Maybe delete unneeded files, move stuff visually ‘offsite’, rename folders, or set up a cloud-based storage account?
I’d love to know!
PS Don’t miss the rest of this series! You can get my posts by email. Just enter your email and hit Subscribe Now at the top-right of this page.


Thanks for sharing this information. Keep up the good work.
My problem is classification. With physical things, you can decide where to put something by asking yourself where you would look for it: socks in the sock drawer in the chest of drawers in the bedroom etc. But with computer stuff, do I file something by person, place, time, subject matter, importance, urgency? I cannot separate my friends and family from my enthusiasms, work, health, plans. Do I file according to organisation or person? Emails are separate from documents – need to link them. Sometimes I think just chuck everything in and g fishing with
Pingback: Give Yourself A Technology Makeover
Evernote is in week 3 of The 30 day Paperless Challenge. I’m new to FB and this is my first event, so not sure how to link people. I love the idea of the Junk and Archive folders! Organizing involves the stress of making decisions, which tempts me to procrastinate. So this is truly a great solution to help get me going toward a paperless system.
Totally agree Laura – in fact I recently wrote a post about the importance of making quick decisions if you want to be organized: http://www.getorganizedwizard.com/blog/2009/09/the-one-thing-you-must-do-if-you-want-to-get-organized/ 🙂
Excellent tips Michele. Creating a Junk & Archived folder is a gret idea. I am going to start one. The challenge I had was deleting unwanted files, ‘cos always that little voice tell me incase you need it in the future… eventhough, I’ve grown out of it & your suggestion is great “just in case”. I use dropbox & I find it is really useful not only to access information from other devices, but also to share files with outsourcing contractors etc.
Thanks Damayanthi! I love my JUNK and ARCHIVE folders – so little real estate for so much clarity and peace of mind. 🙂
thanks…this is great..working on this today!
Fantastic Anna! It will make you so much more productive!
Thank you again for this very informative information. Now that my vacation away is over, I can get back to organizing my computer! I loved dropbox and took it with me on vacation, so that I could share pictures with other members of my family!
It’s my pleasure, Anita! 🙂
And Dropbox has really made my life easier. I’m a HUGE fan!!
It’s my pleasure, Anita! 🙂
And Dropbox has really made my life easier. I’m a HUGE fan!!
going to do this today, since its raining outside and I am currently finished with my chores….
Perfect Stacy! You’ll be so very glad you did. 🙂
Perfect Stacy! You’ll be so very glad you did. 🙂
Wonderful way to get the computer organized! I still haven’t tried Dropbox, but think I’ll give it a try. Thanks!
Really glad you found it useful, Tricia. Good luck with Dropbox! 🙂